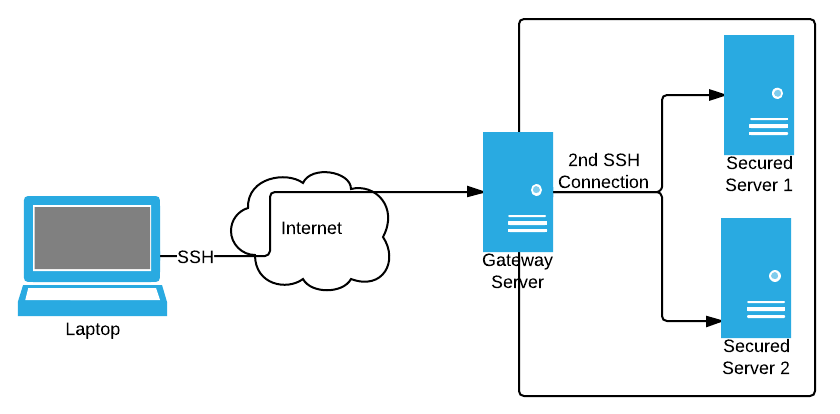
Recently at work, I came across a situation where the web server I needed to access (ssh) could only be accessed via another workstation. Considering that ssh is already quite secure, I didn’t see the point but I had to live with it. But I am inherently lazy, and I always look for ways to make my task easier. What worried me is that this situation is not common enough to be there a generic solution. But I started looking anyway and knowing that the closest thing to this is tunneling, I searched for ssh tunneling, and what do you know, it is there.
Unfortunately, the guides I found were not very clear on how to tweak the commands to my exact needs. I found it through simple trial and error and some reading of man pages. I am noting it down here for my reference (and yours).
I later realized that this is also applicable in case of routed VPN, as the network layout is roughly the same. So, whatever you read below is also applicable if you have are on a routed VPN. You don’t need this if you are on a bridged VPN as you should be able to directly access the servers.
What is SSH tunneling?
Consider the scenario above. You want to access one of the secured servers that are in a closed network. To help you connect, there is a gateway server that you can access normally, and then you can connect to the other servers through this gateway. This is what you would do:
$ ssh user@gateway

user@gateway's password:
You are now connected to the gateway server.
user:~$ ssh user2@secureserver
You are now connected to your intended secure server.
This is okay if you are accessing it once in a while, but it is painful to do it everyday. Further copying files and other common operations become a hassle and a huge waste of time. This is where SSH tunneling comes in.
Get it to work
Actually, all ssh does is forward ports. We’ll forward one of our local ports to try and connect to the secure server’s port 22 (ssh) through the gateway. This is the command to set it up.
$ ssh -L 2222:secureserver:22 user@gateway cat -
Enter the password when prompted (but you should really be using publickey authentication, anyway). After this, in another terminal, use this to connect to the secure server.
$ ssh -p 2222 user2@localhost
That’s it. You can now use ssh, scp, or any other command to directly talk to the secure server through the gateway. You only need to run the first command once and keep it running in a hidden terminal.
Lets break up these commands to understand whats going on:
ssh– This is your regular ssh command.-L 2222:secureserver:22– This instructs ssh to set up port forwarding. It basically means – connect to secureserver on port 22 through the gateway (specified later) and redirect it to local port 2222. This can be any available port between 1024 and 65535. You can use ports below 1024 too, but you need to be a root user for that. If you want to bind port 2222 only for a particular IP address, use the extended syntax-L [bind_address:]port:host:hostport. See the man page for details.user@gateway– This is your regular connection string to ssh to the gateway server.cat -– This is basically just any command that keeps the connection open. You can skip this entirely but then you need a controlling terminal (which means you can’t use it in scripts).-p 2222– This specifies the port to which you want to connect. We specified this in our first command. Keep them the same.user2@localhost– This is a little confusing at first. user2 is the user to connect to the secured server, whereas localhost is, well, ‘localhost’. If you remember, the first command has now redirected port 2222 on your localhost to the secured server. Essentially, you are connecting to your own machine on port 2222 which gets redirected to the secured server by the first command.
Cool, what else can I do with this?
So, you get your ssh tunnel working and now you can directly ssh to the secured server without worrying about the gateway. But there are other servers behind that gateway too! Should I create all those terminals or run ssh so many times?! Well, no.
$ ssh -L 2222:secureserver:22 -L 2223:secureserver2:22 -L 2224:secureserver3:22 user@gateway cat -
Essentially, use the -L option as many times as you need. As long as they are behind the same gateway, you don’t need to worry.
Now, all you need to do is remember those long commands, to start the port forwarding (which creates the tunnel) and then connect! Well, there’s aliases for that.
alias startpf='ssh -L 2222:secureserver:22 -L 2223:secureserver2:22 -L 2224:secureserver3:22 user@gateway cat -'

alias sshsec1='ssh -p 2222 user2@localhost'

alias sshsec2='ssh -p 2223 user2@localhost'

alias sshsec3='ssh -p 2224 user2@localhost'
Now, you can use commands like:
$ startpf (in another terminal, and keep it running)

$ sshsec1

$ sshsec2 uname -a

$ sshsec3 ps -ef
You can save these aliases to ~/.bash_rc or ~/.bash_aliases (preferred) to make them permanent.
You can also run the first ssh command in background by suffixing &. But it only works well if you have set up publickey authentication (which you should).
What if its not SSH?
The beauty of the whole thing is that this is not just about ssh. What the first command does is create a port forward, and thus can be used by anything else. Just use the correct port for the service you want to connect and launch the client on localhost and the port you specified. For instance, if you want to connect to a MySQL server, do this:
$ ssh -L 2306:databaseserver:3306 user@gateway cat -
Now, your local port 2306 connects to the MySQL server on databaseserver. All you have to do is launch MySQL client on your own port 2306 and you see the databases on the other end! But wait, there is a caveat (at least in case of MySQL).
You could use something like this to connect to the MySQL server on databaseserver.
$ mysql -P 2306 -u user -p (but this won't work)
As you might have guessed, the -P 2306 specifies that we have to connect to port 2306 instead of the default port. All fine, but this won’t work, at least not on Unix like systems. The problem is that MySQL programs treat the host name localhost specially on Unix like systems, in a way that is likely different from what you expect compared to other network-based programs. This occurs even if you specify the port with -P. To ensure that the client makes a TCP/IP based connection, use the host option to specify 127.0.0.1, or use the --protocol=TCP option. This is the correct command to use MySQL over a SSH tunnel.
$ mysql -h 127.0.0.1 -P 2306 -u user -p
It goes without saying that this command won’t work if your gateway can’t access the MySQL server on the databaseserver. To verify, ssh to your gateway normally and try connecting to the mysql server from there. If you can’t, the SSH tunnel won’t work either.
References
I hope this has been useful. Do leave comments and share.

